Recipes & Blog

Orchard 2 Oven recipes and ideas. 

Apple Goat Cheese Galette

With my husband and son in Baja Mexico preparing for the legendary Baja 1000 and my daughter visiting her alma mater in Santa Barbara, I find myself sitting in front of the TV being anything but productive.  Channel surfing is providing me no satisfaction, that is, until I stumble upon Giada cutting into some sort of apple galette.   Suddenly my finger stops pushing the up arrow on the remote, she’s got me.  I feel like a voyeur as I watch her take the first bite, describing the taste, as only Giada can, and realize I have to make this.

I immediately start planning….run 3 miles, (I’ll probably need more to work off this treat), search the freezer and pantry for the ingredients.  Because I randomly buy things when I shop, I have all the ingredients, even a frozen puff pastry.  I have no idea what that was purchased for, but lucky for me it was in the freezer.  Her recipe called for 3 apples peeled, cored and sliced into 12 wedges per apple, instead I use Orchard 2 Oven apples from the apple pie filling kit.  Being a Math teacher, I quickly do the math and count out 36 slices and save the rest for another use; my guess, another one of these galettes when my men return home.

This recipe is adapted from a recipe seen on Giada at Home.

Ingredients

2 Tbls      unsalted butter

36            apple wedges

1/8 tsp     kosher salt

1/3 C         sugar

½ tsp        cinnamon

½ tsp        cardamon

½ tsp        cornstarch

1 tsp          fresh lemon juice

1 sheet frozen puff pastry, thawed

1 egg, beaten


Topping

4 oz       goat cheese crumbled

1/3 C       dried cherries  (I imagine Cranberries would be good also)

1/3 C       sliced toasted almonds

2 Tbls      maple syrup


Prepare the apples first and while they cool you can prepare the puff pastry and topping.

Saute the apples, sprinkled with the kosher salt, in the butter until just softened.  Sprinkle the apples with the lemon juice and the mixture of sugar, cinnamon, cardamon and cornstarch and gently toss to coat the apples with all the delicious sweetness.  Take off the heat to cool.


IMG_0375.JPG

Put the thawed puff pastry on a sheet of parchment paper dusted with flour.  Keep turning it over, so it doesn’t stick, as you roll it into a 12 x 12 square.  Cut the corners off so the square looks circular.  Brush the pastry with the beaten egg.   Leaving 2 inches around the outside edge, lay the apples in a circular pattern.


IMG_0376.JPG

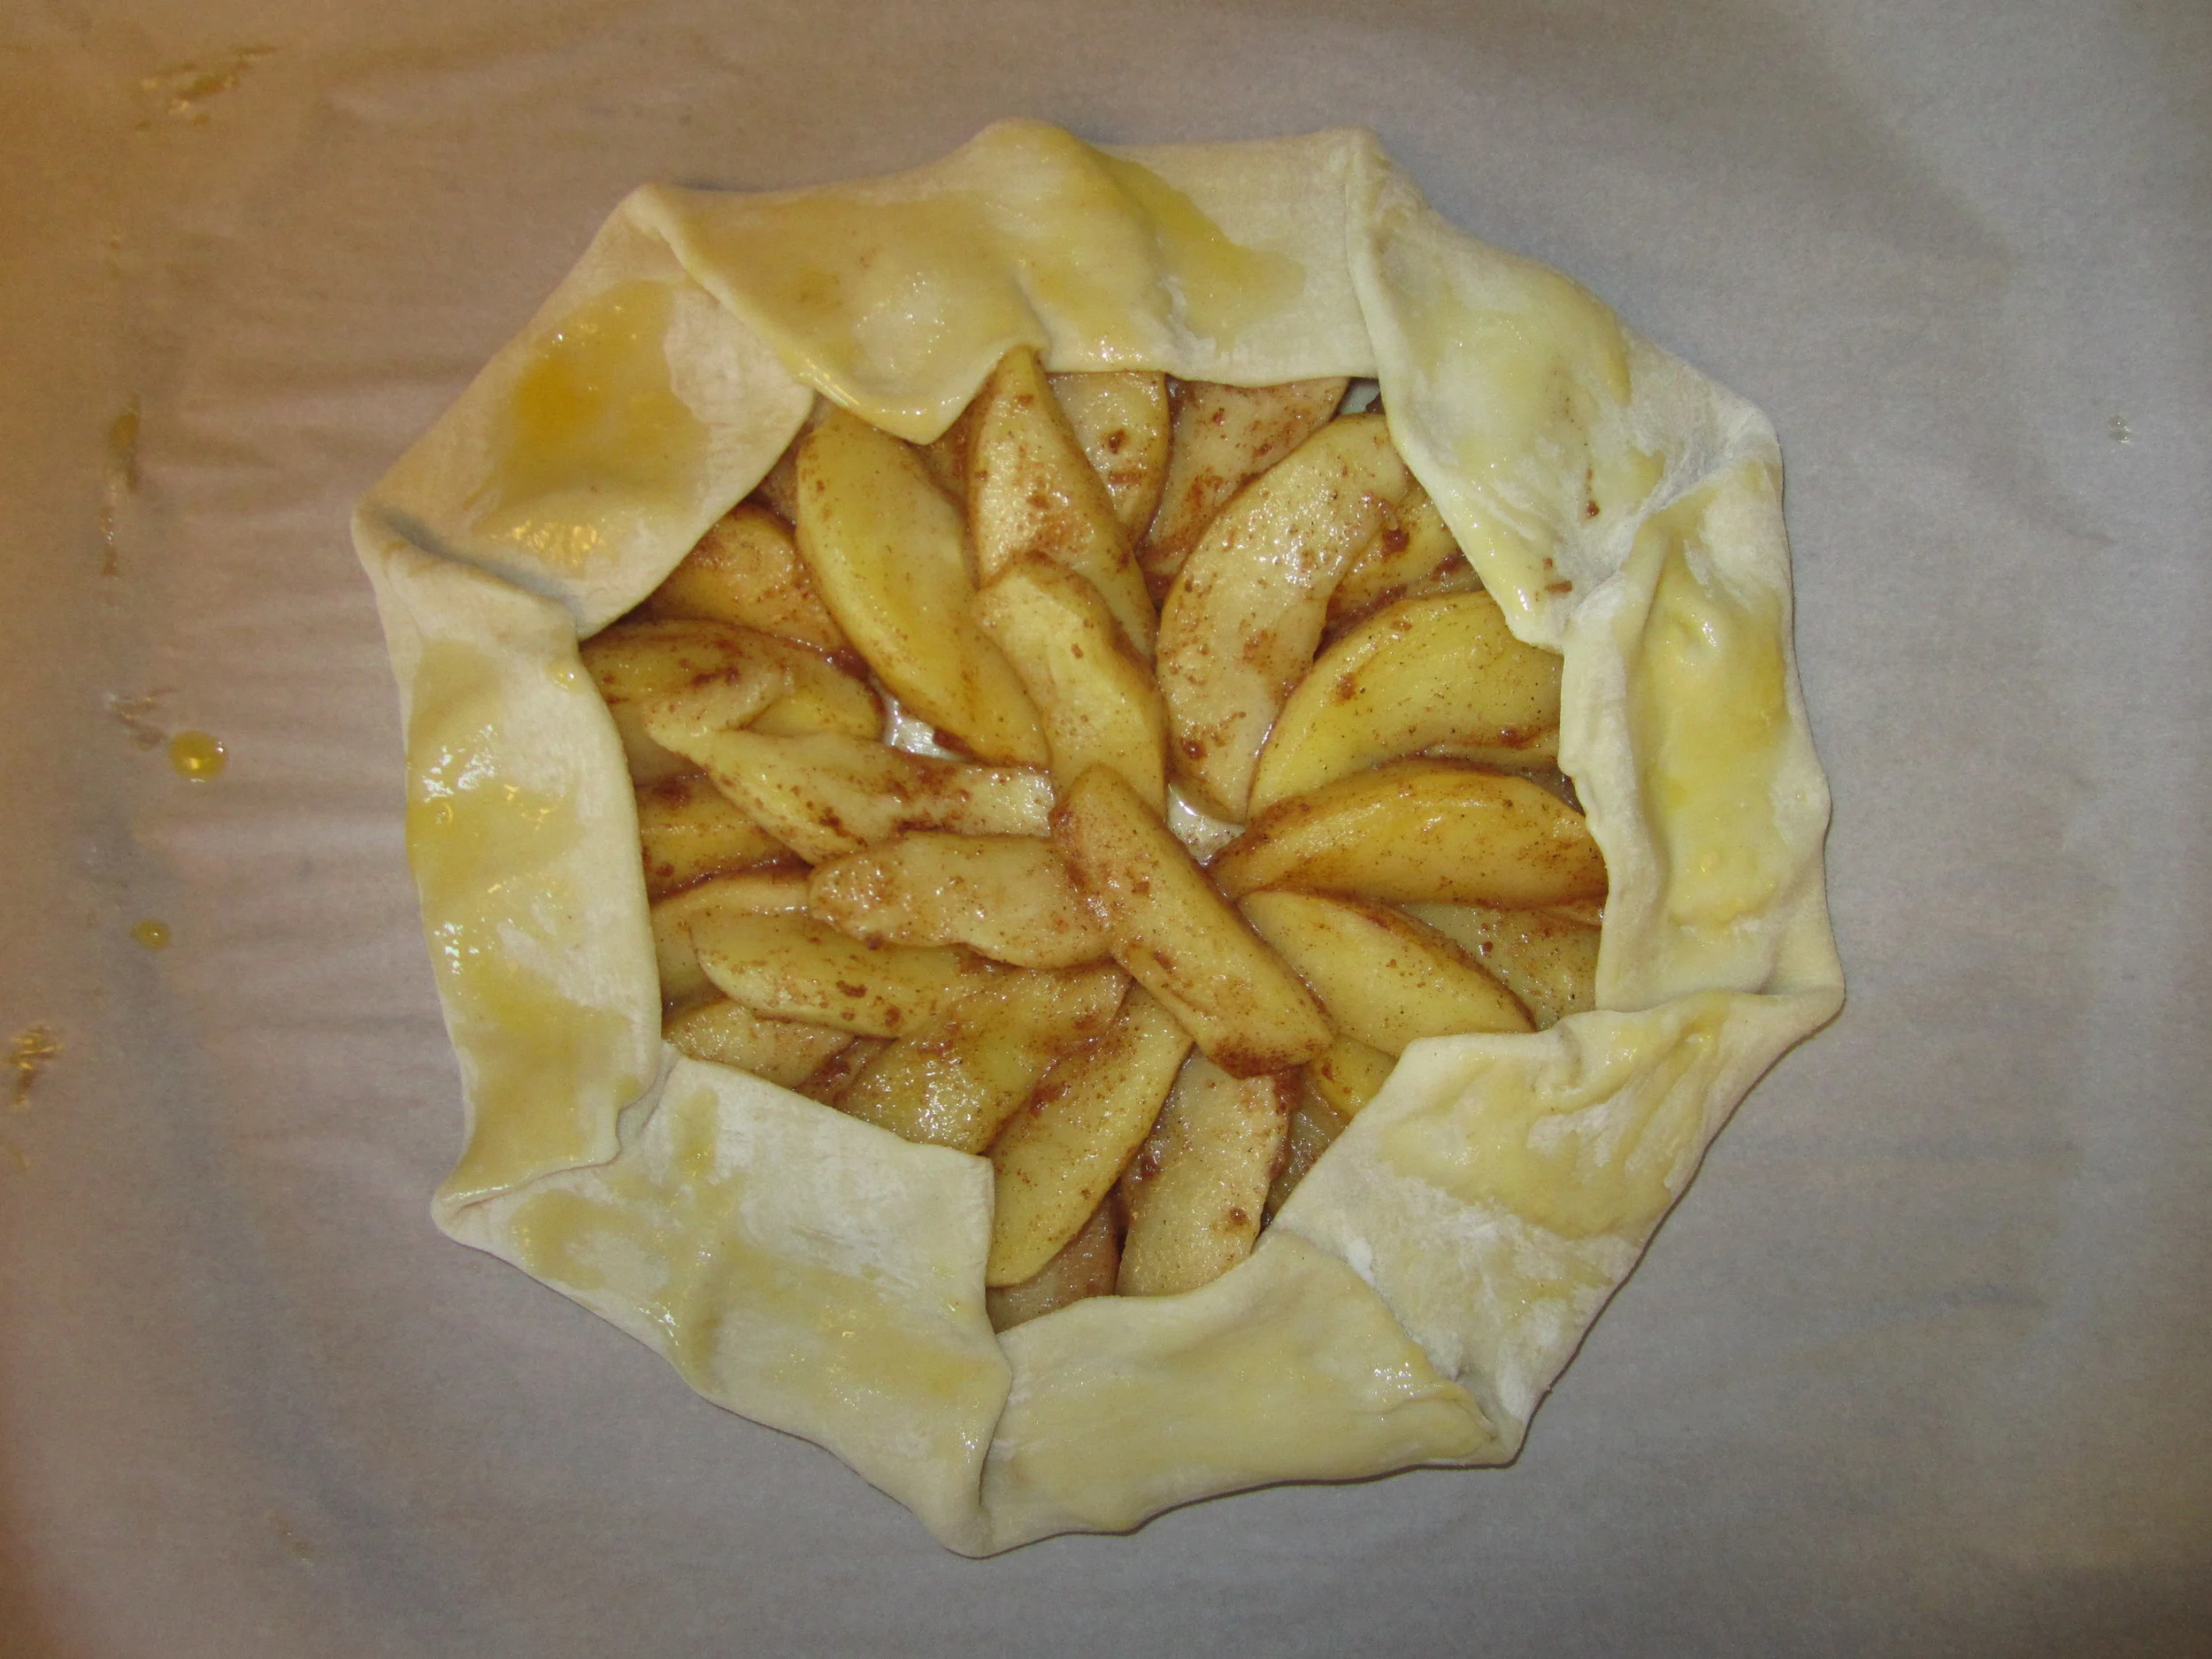
Fold the edges up over the apples and brush the edge with beaten egg then bake for 30 minutes in a preheated 375° oven until the pastry edge is a deep golden brown.


As the galette bakes prepare the goat cheese topping.  Mix together 4 oz of crumbled goat cheese, 1/3 cup of dried sour cherries, 1/3 cup of sliced toasted almonds and 2 tablespoons of maple syrup. 

After 30 minutes remove the galette from the oven and cover the apples with the topping and bake for another 10 minutes.


I remove the galette from the oven to find this….  (I did slide it off the cookie sheet to shoot the picture. )

IMG_0379.JPG


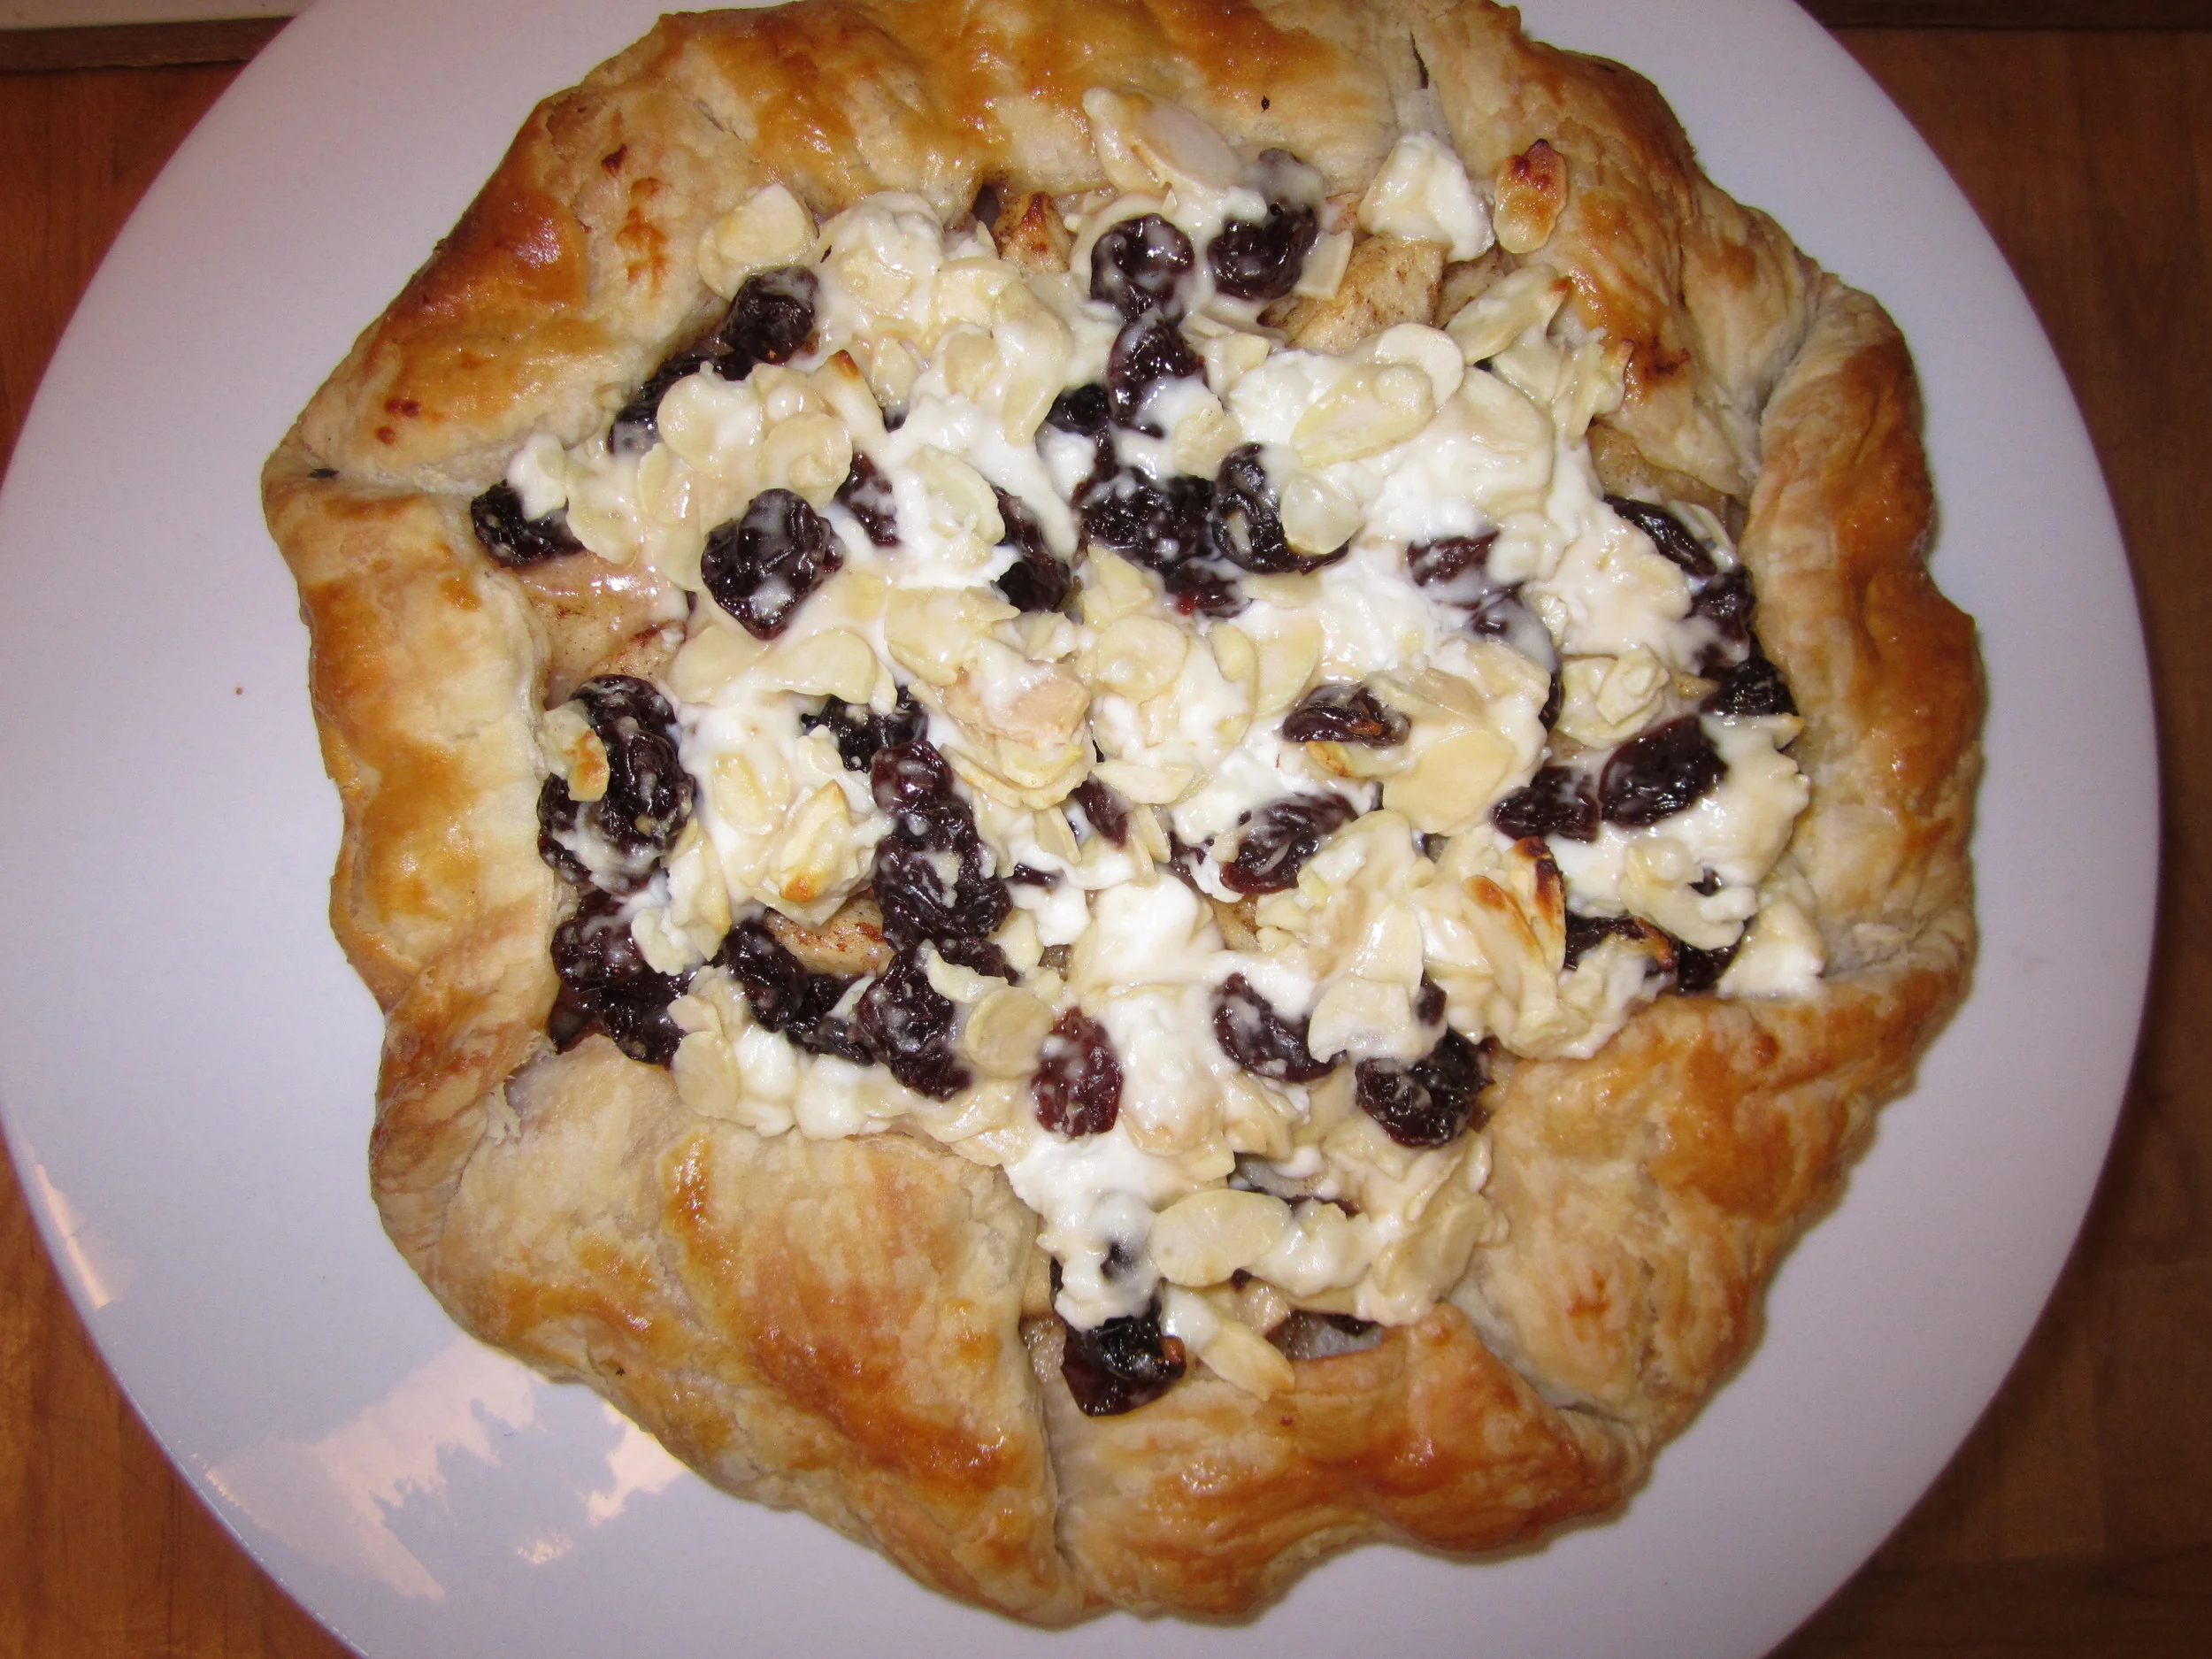
It took everything I had not to cut right into it.  I knew better; I know what hot cheese will do to the roof of your mouth!  I was able to hold out for 30 minutes, I ate a slice and quickly realized 3 miles wouldn’t be enough.   Enjoy!

4th of July Peach Crisp with Amaretti Cookies

            The beauty of Orchard 2 Oven products is it gives you a jumping off point.  It saves you the time of prepping the fruit so you can indulge your inner creativity.

            On 4th of July I was put in charge of dessert so I chose a peach crisp with homemade peach, and vanilla (for the less brave), ice cream.  All my friends know I’m a cooking show junkie so I thought long and hard; and like a medium at a séance, channeled a Food Network star, Giada.  I remembered her making a crisp using amaretti cookies and so I searched; I found the recipe and off I went.  I didn’t follow the recipe exactly because her recipe called for nectarines and blueberries and I had peaches.  I used the recipe anyway because peaches are pretty close to nectarines.  Using Giada’s crumb topping and Orchard 2 Oven peaches I made a delicious dessert that everyone enjoyed.

            The recipe is adapted from Giada DeLaurentis on the Food Network

1 Pkg            Orchard 2 Oven Peach fruit filling

1 C            All purpose flour

1/3 C            Firmly packed brown sugar

1 C            Coarsely crushed amaretti cookies

3/4 C            sliced almonds

1/2 C            (1 stick butter) cut into 1/2 inch chunks.

Stir flour and sugar to blend.  Add the cookies and almonds and mix well  Using your fingers rub the butter into the dry mix until clumps form.  Place peaches, mixed with the glaze, in the bottom of a 9 x 13 inch baking dish.  I like glass so I can see the bubbly goodness when it’s done cooking.  Sprinkle with the crumb topping and place in a pre-heated 350° oven for 45 minutes, or until its golden crisp and bubbly.  This is one you want to serve warm so cool only about 10 minutes.  Serve with your favorite peach or vanilla ice cream and you’ve got a bowl full of the best tastes of summer.  Enjoy!


Orchard 2 Oven -vs- Canned pie mix

As you begin any process you put your heart and soul into the project.  It's your baby and you want people to love it as much as you do.  The doubt creeps in and you take to desperate measures, that's where I found myself today, consumed by pie.  I bought pre-made pies, pre-made crusts, pre-made canned products and proceeded to bake.

Yes, the pre-made pie was certainly easy, but easy isn't always the best.  Next came the popular canned product with a pre-made crust.  My first curiosity was the amount of actual fruit to goop ratio in the canned product.  I sacrificed $4.50 and one can of apple pie mix and discovered about 9.5 oz of apple slices in the 21 oz can.   I want more fruit than goop!  The recipe on the can calls for 2 cans, so $9.00 for just over a pound of apples.  The Orchard to Oven apple pie mix has 2 pounds of fruit and 10.5 oz of glaze, a much better ratio, I think!  To me a fruit pie should look more like fruit.  

All the pies were baked, now what to do with them?  I don't need to eat them all, my husband would love to eat them all, but to save us both,  I choose to take them to school.    I served the slices.   The kids who got the Orchard 2 Oven pie loved it because they said it tasted more like fruit.  Several of the kids that got the sugary pies said they liked the crust best.    This is not a scientific blind taste test, by any means.  I realize that teenagers will eat almost anything; for God's sake they eat hot cheetos and Funyuns for breakfast...don't tell Michelle!  They did not receive extra credit for their comments but they did say if I ever gave up teaching I should bake pies...little do they know!

Pie Crust

Pie crust is something every Pie Lover feels strongly about. Flakey, tender, butter, shortening, lard, eggs, vodka, the recipes are endless and every one will have someone proclaiming its merit. I’m in no way claiming this to be the ABSOLUTE BEST, but, I have found this recipe to be tasty and very easy to work with.

  • ​2 1/2 Cups All purpose flour
  • 1 Cup Unsalted butter, very cold and cut into small cubes. I'm sort of a butter snob and like the color and taste of European butter, but I'll use whatever is in the fridge.​
  • 1 Teaspoon Salt
  • 1 Teaspoon Sugar
  • 4 - 8 Tablespoons Ice cold water

Place all the dry ingredients into the bowl of a food processor. Add butter a few cubes at a time and pulse 5 times the let it run for 5 seconds. Continue until all the butter is used and the dough looks like coarse meal. If you don’t have a food processor use a pastry blender (it is the wooden handle with 5 wires), you don’t have this either? Don’t despair. You can use your fingers. Rub the butter into the flour until it the dough looks right. 

Now is the time to add the water. Turn the food processor off and sprinkle 4 Tablespoons of the water over the dough. If you add it while the processor is running the water falls to the bottom and you end up over working the dough. Pinch a bit of the dough and see if it holds together, if it doesn’t then add one Tablespoon at a time, until it begins to hold together. The dough should not be too wet. If you are working the dough by hand toss the dough with a fork to incorporate the water.

Divide the dough in half and form into 2 disks. The tighter the disk the easier it will be to roll out later. Wrap each disk in plastic wrap and refrigerate for about an hour to let the dough rest. This is necessary to make it easier to roll out the dough.

On a floured surface or pastry sheet roll each disk you will use into a 14 in circle. This is probably the most frustrating and intimidating part of pie making. Roll the dough in one direction not back and forth, easing up at the edge so it does not get too thin: 12 o’clock, 6 o’clock, 3 o’clock, 9 o’clock, roll around the clock. Rotate the dough so it doesn’t stick too much. Continue this until you get to the right size. 

Carefully roll the dough over the rolling pin to move it to the pie dish. Gently guide it into the dish trying not to stretch the dough too much. If it tears don’t worry, just pinch it together and remember no one will see it because it will be filled with delicious fruit.

Depending upon your taste you may not want to trim the dough to a one inch overhang. If you are making a double crust pie, now is the time to pour in your fruit filling. Cover the fruit with the other crust. Pinch the top and bottom crust together and roll the edge under so it sits on the edge of the pie dish. Begin crimping or fluting the crust so it looks as beautiful as it will taste. Don’t worry if it does not look like a processed pie, it won’t taste like one either!!!! 

I like to make a foil ring to cover the edge of the pie so it does not burn. I hope this helps. I know pie crust can be intimidating, but like anything practice makes perfect and the more you practice the more delicious pies you can eat.  I’m still trying to get my pies to look as beautiful as the ones my Aunt made when I was younger.

Crisp or Crumble Toppings

One of the great things about Orchard to Oven Pie fillings is how easy it is to use in a crisp or crumble. Technically there is a difference between the two but unless you’re cooking for a Good Eats junky, most people won’t know the difference. Call it what you will they are both have an intoxicating blend of butter and sugar at their core. Here is a good all around topping. I guarantee no one will turn their noses up at a warm dish of fruit covered with this rich topping, whatever you call it. This crumble recipe is for a 9x13 baking pan or two 8x8 baking dishes. When I am making a quick crumble for a small serving I like to freeze the leftovers to use for another time!

  • 1 Cup Oatmeal, don't use instant or quick cooking
  • 1 Cup All purpose flour
  • 1 1/2 Cup brown sugar
  • 1/2 Teaspoon pumpkin pie seasoning
  • 1/2 Teaspoon cinnamon
  • 1 Cup Butter, let's face it, everything is better with butter!​

Place all the ingredients in a bowl and blend together. You can work with your fingers, pastry blender or whatever you have. If you like nuts you can add finely chopped almonds, pecans or walnuts to your topping.  A 1/4 -1/2 C of chopped nuts depending on how nutty you want it to be!

Place your prepared Orchard to Oven fruit filling into a 9 x 13 dish and sprinkle the topping over the top. Bake for 40 – 45 minutes or until the filling is bubbly. It’s best served warm with your favorite ice cream.